Monday, February 21, 2011

Phase 3: Attach dish to pole and test structural stability

This phase will involve getting the dish onto the pole and then making sure it's not going to fall over, blow over, bend, rock, tilt, sway, ect, ect. This is the phase I am currently on. This past weekend I have gotten the dish onto the pole. Today is the first full day that it will be exposed to the elements.

We will most likely let it as is for a week or two to the wind some time to take a whack at it. During this time we plan on adusting the pivot point to make it as easy as possible for the dish to move in a way that is most accurate with the way the sun moves across the sky. I may get a weatherproof box together to store the electronics during this time as well. I'll update this post as this phase continues.

p.s. Pictures of the dish attached to the pole will come this weekend. It's HUGE!


Additionally, I cleaned up the dish with a pressure washer.


UPDATE:

I've completed attaching the dish to the post with the help of my dad and brother. We also lined it up partially and tried running the actuator. The 24v 1A dc power supply just can't cut it. I'm in the market for a 36v 3A replacement.


Phase 2: Acquire longer pole, prepare for cement, and erect 10' satellite dish in final position at my parents house.

In this phase I needed to get a longer pole and get a hole dug big enough to fit a wooden box we made for the concrete.y

Where I work we have access to 2" tubular steel. The maintenance guy was kind enough to weld a bunch of these pieces until we had three 2" diameter 10' or so poles. These were then welded together. Ideally this pole would get the dish above the tree line you can see, but what we got should get us the majority of the days sun.

To prepare for the concrete we invested in a backhoe. This was the costliest part of the project.  We dug a big ol' hole and stuck our box in. We had already ran our water and power lines by this point.

Here's the result.


Phase 1: Acquire 10' satellite dish and transport home

Here's how this phase works. I need to find a dish as close as possible to my parents house, for as little cost as possible, and with as little hassle as possible. I then need to transport this bad boy to my parents house.

Here's how it worked out. I found an older gentleman that had one in his back yard who was thrilled that I was willing to haul away this thing he had to mow around every week for free. He told me he had paid over $4500 for it and the equipment many years ago when c-band was still popular. He told me he would let the dish go for free, but he wanted $20 or $25 for the electronics used to control it.

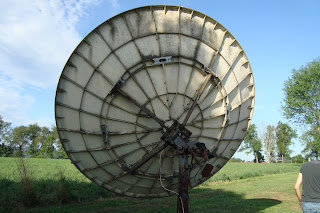
That weekend my dad brought his trailer over and we disassembled the dish and brought it home. It was a really nice day out which made things nice.


That's actually mold on there. Yeah, gross. I did power wash it off which helped a lot!

I said it was a nice day out :).


Introduction - What is a solar dish and what is this project about?

Here is the goal:


The concept is fairly simple. The idea is to focus as much light as possible onto as small of an area as possible which focuses the suns energy on water which is then used for various heating applications.  My work is completely motivated by others that have done similar projects. Their videos are posted on youtube and I recommend searching for them.

To put this concept to a practical application my plan is to take an old 10' satellite dish, cover it in 4"x4" mirrors and then collect the resulting heat in circulating water, and then use that hot water as preheated water for my parents domestic hot water.

Sounds simple!

Here's a breakdown of the general phases of the project.

Phase 1: Acquire 10' satellite dish and transport home
Phase 2: Acquire longer pole, prepare for cement, and erect 10' satellite dish in final position at my parents house
Phase 3: Test structural stability
Phase 4: Configure electronics and safety equipment
Phase 5: Cut and assemble mirrors onto the dish
Phase 6: Connect collector and water lines
Phase 7: Test